Windows 10/11 22H2 Upgrade Powershell Script

At work, we’ve been having some issues crop up, mainly around Office 365 suite, but it seemed to be more present on systems with Windows 10 21H2 than systems that were upgraded to 22H2 already. So I needed to find a way I could easily upgrade dozens of machines without having to login to each one.

We use Pulseway RMM to manage machines, but on the couple I tried to check, it wasn’t showing 22H2 as an available update. So I hit up Google and started searching. Took a little bit to find, but I came across this Reddit article: https://www.reddit.com/r/PowerShell/comments/zz4t7b/upgrade_windows_10_to_22h2/

The person had written a Powershell script that would download the latest ISO installer, extract the ISO to a folder and then trigger setup to run silently. I thought this was perfect, it should do exactly what I need. Now I had just reloaded a few machines in the last week or two, so I had recent ISOs already downloaded. Instead of downloading the ISO from the internet onto dozens of systems, I figured I’d stored the already downloaded ISOs on the DC and let it copy them from there.

Now I haven’t exactly figured out how to use all the Scope settings in Pulseway yet, so I also needed a way to check the Windows version number before running the rest of the script. I found this command that allowed me to check the current version via Powershell:

(Get-CimInstance Win32_OperatingSystem).version

Since most of our machines are 21H2, this came back as 10.0.19044. Here is the list of numbers I found:
Win10 21H2 10.0.19044
Win10 22H2 10.0.19045
Win11 21H2 10.0.22000
Win11 22H2 10.0.22621

So for my windows 10 machines, if the version matched 10.0.19044, the script would keep going, if not, it would exit and quit.

Here is the finished Windows 10 script:

$WinVer = (Get-CimInstance Win32_OperatingSystem).version

If (!($WinVer -match '10.0.19044')) { exit }

If (!(Test-Path C:\WindowsSetup)) {
    New-Item -ItemType Directory -Path "C:\WindowsSetup"
}

copy \\DCServerName\NETLOGON\Installs\Win11_22H2.iso c:\windowssetup

$DownloadPath = "C:\WindowsSetup\Win11_22H2.iso"

$mountResult = Mount-DiskImage -ImagePath $DownloadPath
$driveLetter = ($mountResult | Get-Volume).DriveLetter
$ExtractPath = $driveLetter + ":\*"
Copy-Item -Path "$ExtractPath" -Destination "C:\WindowsSetup\" -Recurse -Force -Verbose
Dismount-DiskImage -ImagePath $DownloadPath
Remove-Item "C:\WindowsSetup\Win11_22H2.iso" -Force
$ArgumentList = "/auto upgrade /eula accept /quiet"
Start-Process -NoNewWindow -Wait -FilePath "C:\WindowsSetup\setup.exe" -ArgumentList $ArgumentList

Here is the finished Windows 11 script:

$WinVer = (Get-CimInstance Win32_OperatingSystem).version

If (!($WinVer -match '10.0.22000')) { exit }

If (!(Test-Path C:\WindowsSetup)) {
    New-Item -ItemType Directory -Path "C:\WindowsSetup"
}

copy \\DCServerName\NETLOGON\Installs\Win11_22H2.iso c:\windowssetup

$DownloadPath = "C:\WindowsSetup\Win11_22H2.iso"

$mountResult = Mount-DiskImage -ImagePath $DownloadPath
$driveLetter = ($mountResult | Get-Volume).DriveLetter
$ExtractPath = $driveLetter + ":\*"
Copy-Item -Path "$ExtractPath" -Destination "C:\WindowsSetup\" -Recurse -Force -Verbose
Dismount-DiskImage -ImagePath $DownloadPath
Remove-Item "C:\WindowsSetup\Win11_22H2.iso" -Force
$ArgumentList = "/auto upgrade /eula accept /quiet"
Start-Process -NoNewWindow -Wait -FilePath "C:\WindowsSetup\setup.exe" -ArgumentList $ArgumentList

You’ll need to modify the copy command to point to your server name. Also, as the original Reddit post points out, if you don’t want it to auto reboot, you can add the /noreboot switch to the $ArgumentList line.

Microsoft 365 – OneDrive Direct Download Link

Was recently testing something and needed the ability to download a file I was sharing from OneDrive. By default, when you use a share link, it takes you to a webpage and you have to click the download button. Found info online on how to turn this into a direct download link.

Copy the Share URL, then just add “&download=1” (without quotes), this will now be directly downloadable.

FortiGate – FortiGuard Servers with SD-WAN

We’ve started rolling out SD-WAN setups at all our sites with redundant internet connections. Had a couple of them run into issues connecting to FortiGuard and had to contact support. Here is the CLI they ran.

config system fortiguard
    set fortiguard-anycast disable
    set protocol udp
    set port 53
    set sdns-server-ip "208.91.112.220" 
    set interface-select-method sdwan
end

This disables the anycast settings, sets the port and protocol and configures FortiGuard to use the SD-WAN interface. What I found out later is that when you disable anycast, you also need to specify an SDNS server for the firewall to update all the security profiles from. The US server is 208.91.112.220.

You also need to update the FortiGate DNS servers to use the SD-WAN connection.

config system dns
    set primary 208.91.112.53
    set secondary 208.91.112.52
    set interface-select-method sdwan
end

FortiGate – DHCP Domain Name

We have a couple sites that are small and DHCP is run from the FortiGate firewall, but since we run Windows Active Directory, we need to add the domain to the DHCP server.

Conf sys dhcp server
Show  (find your subnet)
Edit # (where # is your DHCP server number for the subnet you're editing)
Set domain domain.local
Next
end

FortiClient – SSL VPN Profiles

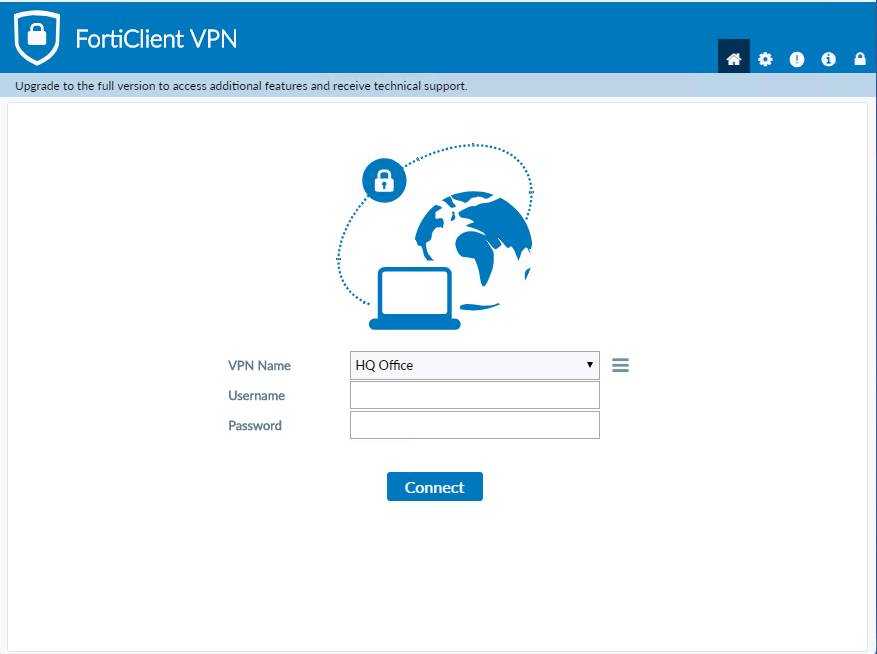
If you’re like me, over time you’ve build up SSL VPN connections to various sites or clients. If you need to transfer these to another system or just want to back them up in case you need them, here are the locations in the windows Registry you can back them up from.

User entries:

Computer\HKEY_CURRENT_USER\Software\Fortinet\FortiClient\Sslvpn\Tunnels

System entries:

Computer\HKEY_LOCAL_MACHINE\SOFTWARE\Fortinet\FortiClient\Sslvpn\Tunnels

You can backup all of them by exporting the Tunnels folder, or individual connections per site.

FortiSwitch – Configure Static IP

I have a couple FortiSwitches that I’ve had to manage as standalone, but for some reason it always gives me issues assigning the static IP address through the Web UI. Here is the CLI for assigning a static IP.

Config system interface 
Edit internal 
Set mode static 
Set ip x.x.x.x x.x.x.x 
Set allowaccess https ssh ping

FortiLink Managed Switches over Wireless P2P Bridge

I have a couple remote buildings at work that we were previously managing the FortiSwitches in standalone mode, which worked, but we didn’t get the ease of managing everything from the FortiGate like we did with most of our switches.

Took a couple months of searching around (in between other projects and tasks), but I finally managed to get this to work.

Once you know what port on the FortiLink managed switch you are going to use, login to the CLI for the switch and run these commands:

config switch physical-port
edit port#
set fortilink-p2p enable
next
end

Then, before connecting the remote switch to the P2P bridge connection, run the following CLI commands:

config system global
set switch-mgmt-mode fortilink
end
Prompt to reboot, hit Y


config switch global
set fortilink-p2p-native-vlan 4094
end
config switch physical-port
edit port#
set fortilink-p2p enable
next
end

After this is done, plugin the P2P cable, give it a couple minutes to load. You will then see the remote switch show up in Managed Switches awaiting to be authorized.

Windows Power Settings Profiles

At my work, we tend to do a lot through CLI commands as we have the ability to run them through the CLI on our remote management agent. In case you ever wanted to know what the CLI commands were for changing power profiles, here they are.

This command will list the profiles on the system, placing an * next the currently active profile.

powercfg /l

Here is a list of the profiles with the GUID code.

Existing Power Schemes (* Active) 
----------------------------------- 
Power Scheme GUID: 0c7d7771-6e86-4e91-85a6-bde8f213dda8  (ThinkCentre Default) * 
Power Scheme GUID: 1eb70a2d-48d9-4d08-b7ab-ab9a0c400b06  (Maximum Performance) 
Power Scheme GUID: 262938da-66d2-454a-942b-88d5ae3cff8f  (Video Playback) 
Power Scheme GUID: 381b4222-f694-41f0-9685-ff5bb260df2e  (Balanced) 
Power Scheme GUID: 8325a222-37a9-4f5e-a71e-63a4836dae33  (Power Source Optimized) 
Power Scheme GUID: 8c5e7fda-e8bf-4a96-9a85-a6e23a8c635c  (High performance) 
Power Scheme GUID: a1841308-3541-4fab-bc81-f71556f20b4a  (Power saver) 
Power Scheme GUID: c344022c-a8be-48bf-9c4f-9a27c56bf419  (Maximum Energy Saving) 
Power Scheme GUID: df8fe310-ce94-457e-aa78-a679413da7b9  (Timers off (Presentation)) 

Here is the command to change the active profile. This one is using the GUID for the High Performance profile (monitor to sleep, but not system).

powercfg /s 8c5e7fda-e8bf-4a96-9a85-a6e23a8c635c